Requirements
To use Free PDF, you will need (links
Current of 6/23/00):
-
A Windows 95/8 machine
-
Free PDF Currently v0.95 Public Beta (All these Free PDF webpages are included in the Free
PDF Download )
-
Ghostscript
look under the Windws section
gs601w32.exe
Aladdin Ghostscript 6.01 for Win32 5,232,640 bytes
You may also want to get GSview while you're there. It's a Windows GUI front-end
for Ghostscript and can be used like Acrobat Reader for PDFs or PostScript.
-
Redmon (a Printer
Port Redirection creation enabler and Monitorer)
RedMon version 1.5 can be downloaded from
ftp://ftp.cs.wisc.edu/ghost/ghostgum/redmon15.zip
-
Acrobat
Reader from Adobe (which you probably already have or you wouldn't be
interested in this program)

-
To do some "Non trivial" Installing and configuring
Free PDF is a Windows 9x program only!
NT/2000
The ZipGuy can't test NT or Windows 2000. There may security issues with
these because of NT/2000's security model. The File created will be
owned by whomever started the printer spooler. So, if they have more
privileges than you do, you may not be able to access the output. If
you can log onto an Id which has high enough privileges it shouldn't be a
problem.
Installation and Configuration
The Setup is a pain but then again the price is right! Mostly the setup is
hard because you need to
-
get four programs (probably only three)
-
install them
-
configure them properly so they can work together like this

If you don't understand this diagram, then read the
Background page
BEFORE YOU ACTUALLY TRY TO INSTALL AND CONFIGURE!
Make sure you have read these web pages and
understand what you are trying to do.
If you have, you should be able to get this version to work.
If you haven't, all bets are off, and you're on your own.
Once you do understand the above diagram you are ready.
-
You should have Downloaded
-
Free PDF Currently v0.95 Public Beta (These webpages are included in the Free PDF
Download )
-
Ghostscript
for Windows 9x.
-
Redmon for
Windows 9x
-
Acrobat
Reader (which you probably already have or you wou;dn't be interested
in this program)

-
Install
-
Ghostscript (put it in the default directory or Free PDF will require more
configuring! So just use the default. i.e. C:\Aladdin\gs6.01 )
-
Install RedMon - Unzip ot into a directory under Ghostscript
like this C:\Aladdin\redmon. Of you put it somewhere else then in the
RPT1 port setup below you must diverge from the directions and specify
the new path where the redrun.exe program lives.
-
Free PDF can be in any directory, but to be in sync with this doucmentation
use C:\FREEPDF\. This is easy because the installer defaults to this
directory. If you put Free PDF in another directory, make sure to adjust
the RPT1 properties accordingly in Step 4 below. So under you C:\ drive
things look like this:

-
-
If you install Ghostscript and Acrobat 4.0 in the default directories the
installation will go smoother. If you don't, you will have to do additional
configuration either by using the 'Configuration' button or by editting the
FREEPDF.INI in the FreePDF directory appropriately.
The default directories and file location are:
C:\Aladdin\gs6.01
for Ghostscript |
C:\Program Files\Adobe\Acrobat 4.0\Reader for Acrobat Reader |
Free PDF will call
C:\Aladdin\gs6.01\gswin32c.exe
to convert to PDF |
Free PDF will call
C:\Program Files\Adobe\Acrobat 4.0\Reader\AcroRd32.exe
to display the output file
|
and Free PDF wants to be installed as a directory under the root C: drive,
though it can be anywhere. The Free PDF installer does this just take the
deault. (If you put Free PDF in another directory, make sure to adjust the
RPT1 properties accordingly in step 4 above)
These directions assume that you've used the default folders
-
OverView: Install and configure RedMon and RedRun
-
Install Redmon (setup.exe) in the redmon folder
-
Add a magic redirected printer port (Using the properties of any existing
printer)
-
Add a PS printer
-
Map it to the redirected RPT1 port
-
Configure that port to ,
-
Modify the PostScript settings of this printer (a little) to make Ghostscript
happy
-
Detail: Install and configure RedMon and RedRun
-
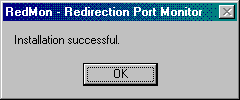
Install Redmon (run Setup in the RedMon Directory)

Click "Yes" and now you can create "Redirected Ports". All you see is

-
Create the New RPT1 printer port, Add the "Apple LaserWriter II NT" Driver
-
View the printer properties of any existing printer, select the Details tab.
-
Take note of the port to which the printer is
currently printing, because you will have to change it back to this
later. Adding a port changes this value without asking. Nice huh?
-
Select the Add Port button. Select Other, Redirected Port then OK

-
The RedMon Add Port dialog will appear. Accept the defaults.

-
After doing this, remember that this is an existing printer! So make sure
to change the"Print to the following port" back to LPT1 of what ever it was
before you started to add a port. or you will screw up your existing
working printer! You were told to take note of it's orginal setting above.
-
Using the Add Printer wizard, create a new printer object for a PostScript
printer. A suitable one is Apple LaserWriter II NT.

-
Do NOT print a "test page" even if the wizard recommends that your do!
-
Note that while in the "Add Printer" Wizard you may want to name this printer
"Create PDF"
-
From your new Printer's "Properties", Click on the "Details" tab.
Then change the Click on the "Print to the following port" and select "RPT1"
to make it use the magic redirected port

-
Next click on the "Port Settings" button and set up the "RPT1
Properties" dialog the way that Free PDF wants it.Fill in the RPT1 Properties
dialog with:
-
Enter the "Redirect this port to the program" as
C:\Aladdin\redmon\redrun.exe
-
Set the "Arguments for this program:" as
C:\freepdf\frpdf095.EXE "%1"
-
Set "Output" to:
Program Handles Output
-
Set "Run" as:
Minimized
-
Check the "Print Errors" check box
It's probably a good idea to double and triple check your
fields
THEY MUST BE PERFECT WITH NO EXTRA LEADING OR TRAILING SPACE!
-
Then hit the "Log File" Button

-
When you do this the the "RPT1: Log File Properties Box" appears. Configure
this as follows:
-
Check the "Use Log File" checkbox
-
Set the "Write standard Ouput to the file" to
C:\freepdf\freepdf.log
-
Check the "Debug" checkbox on as this will give you more information (even
though it may be too much)
 .
.
Configure it as above and a log file will get written each time you print
a file to the "Create PDF" printer.
You can look in this file to see what happenned rather than having to guess.
The good information for debugging is at the top, and way down at the
bottom
-
After you have done correctly configured these two dialog boxes, double check
them and then click "Ok" to accept them
-
Next, resume in the RedMon Help until just after where he describes the log
file settings.... and do the following:
-
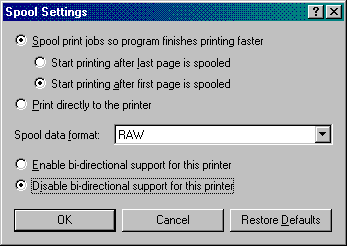
"From the printer properties of this PostScript printer, select the Details
tab, then select the Spool Settings button.
-
Change the Spool data format to RAW.
-
Select Disable bi-directional support for this printer
This last change is most important.
If you do not "DISABLE BI-DIRECTIONAL SUPPORT"
REDMON (and therefore Free PDF) WILL NOT WORK.

-
From the printer properties of this PostScript printer, select the PostScript
tab.
Optional, but strongly Recommend further steps
Once you get Free PDF working you may want to add another printer just like
your "Create PDF" printer, but instead use a the "HP Color LaserJet PS" printer
driver to get JPG's in your created PDFs to come out in color instead
of greyscale (mix of black and white). Thanks go out to Eric
Santos, a happy Free PDF Customer (see his 7/5/00 post in the message board)
who found that using the "HP Color LaserJet PS" printer driver yeilds PDFs
which have the jpg's in color! Well, he did have some help from the ZipGuy,
but he's the one who found the printer driver that works in making color
for jpg's.
It is now recommend that once you get Free PDF working you create another
printer which uses this driver if you want to do color jpgs in your
PDFs. Make sure to leave the "Use PostScript Level 2 features" option
turned on in the "Advanced Postscript Options" which you get to by
hitting the "Advanced" button from the "Postscript" tab of the
printer's properties.

PDF (Portable Document Format) is
Copyright ©2000 Adobe Systems Incorporated. All rights reserved.
Brought to you by Courtesy of The 
some


